
Filming yourself and others
At times, it may be necessary to record or stream yourself using personal devices, such as computers, phones, or entry-level cameras.
The aim of these guidelines is to take inventory of what technology you have at your disposal and to decide how best to record audio and video files or take part in an online interview or virtual panel discussion.
Self-recorded statements, online interviews and virtual panel discussions are in high use currently but have been used by major live news channels for several years. Often, this is a time and money saving exercise and is not regarded as a replacement for professional in-person interviews. We, as a University, should take the same approach to self-recorded content: where time and budget is limited, this is considered acceptable, but for high-profile video pieces, you should always engage with a professional videographer.
Before you begin
These guidelines are to help you record or stream the best video and audio you can with the equipment you have to hand. You do not have to tick off every instruction but please make sure most are adhered to where possible especially when it comes to presentation of yourself. If needed, seek the help of a colleague with more technical knowledge or email the Studio team for guidance.
What device is needed?
For this to work you will ideally have one of the following.
- Modern smart phone or tablet running either Android or iOS
- Desktop or laptop computer with webcam and microphone running Windows, macOS or Linux
- Standalone camcorder – either a DSLR or camcorder (optional)
- Standalone microphone – either a professional microphone, headset or combined with headphones (optional).
Recording/streaming environment
- For any recording or streaming you must have a quiet area or room to yourself to record
- Switch off any radios, TV, or other noise sources. Put your phone on silent. If you are using a computer, ensure all other applications are closed to avoid alert sounds
- Remove loud background noise by closing doors or windows to the area you are filming in
- This room or area will ideally be private to avoid interruption
- Make sure that the room or area is free from loud background noise such as traffic, air conditioning etc that would cause unwanted distraction
- Try to use a space with plenty of light to your front and a professional/tidy or blank background to record yourself against (think of interview on the news which are often done in front of bookshelves, for example)
Top tips for all video devices
- Test the video and audio quality beforehand
- Film in HD 1280x720 or Full HD 1920x1080, although this is not essential
- Ensure your device is positioned at eyeline level, in a stable position. Do not hold the device yourself – rest on a shelf or table to avoid handling noise
- Film with a good light source (lamp/window etc) either in front or to the slight side of you. Do not film with a window or strong light source behind you, as this will darken your face
- Clean the camera lens prior to recording
- Give enough distance from the camera. Sit in the middle or slightly off centre leaning towards the middle, making sure the top of your head is not cut off
- Remember to speak clearly, at a natural pace and try not to rush
Please note
The use of personal devices for filming is only advised when an experienced videographer is unavailable, and the University reserves the right to restrict the publishing of poor-quality content.
Top tips for powerful interviews
The comfort of the contributor during filming is paramount; being in front of the camera can be a daunting experience especially for the first time.
These tips will help you to maintain a professional yet friendly atmosphere resulting in good quality, useful content:
- From first contact with the contributor make sure to give them accurate and in-depth information about the filming and answer any questions they may have
- Meet the contributor on time at a pre-scouted location
- Maintain a conversation with them, try not to leave them in silence while you prepare/get ready. Ask how they are and chat about their subject, always seem curious to know more. This informal conversation will lead to a more natural conversation on camera
- Position the contributor somewhere they won't have distractions within their field of vision. Isolate any noise if you can
- Have them sit or stand in comfort. Ask them to find a comfortable position where they are not straining themselves, or they will slouch and fidget over time
- Make sure the lighting is not too intense. Check if they are squinting because the lights are too bright
- If you are using a lapel microphone ask them politely to pass the microphone up through their clothing and clip it on the outside near or on the collar. If they are wearing something that does not allow this such as a long clothing, run the microphone over their shoulder
- Ask the contributor to either look straight at the lens (piece to camera) or directly at you/the interviewer (interview). If you are recording alone then let them know you may glance at the equipment from time to time, and they should try not to be distracted by this
- Reassure them that if they fumble or make a mistake that they can go back and redo that segment
- Check the subject looks presentable and politely notify them if they have any loose hairs on clothing, a bent collar etc. by pointing to that area on yourself
- During interviews, keep the contributor talking. It is not an interrogation with set questions, but a conversation that you happen to be filming. If they feel relaxed and can see you are interested, the passion for their subject will come through
- Use your intuition. Explore and enquire about related matters that may lead to interesting content. If you feel they have skimmed over an important subject, ask questions to uncover more information. It’s better to have too much content than too little
- Thank the contributor for their time, ensure they have signed an Image Rights Consent form and that they are able to contact you or a colleague in future.
Recording offline using your webcam
- Ensure your camera is positioned at eye level. Laptop users will need to raise their devices to eye level rather than pointing the camera upwards.
- Avoid using headphones unless the built-in microphone is of poor quality. If this is the case, use wireless earphones as an alternative
- Use your default camera app to create the video recording
- Try to look into the camera lens and not at the screen
Using a Windows 10/8.1 PC
- Click the 'Start' menu button in the bottom-left corner of the screen
- Type 'camera' into the search bar or scroll down the menu until you spot the word 'camera'
- The camera app will open on the screen. This should automatically start your webcam. If asked 'to allow the app permission to access your webcam and microphone', give all requested permissions
- Click the 'Settings' button; it is a cog symbol in the top-right corner of the screen
- Scroll down the right column to the 'Videos' header, and then select your desired resolution from the drop-down menu. The higher the resolution, the better the quality (and the larger the file size)
- Click the video icon. It is the outline of a video camera on the right side of the window. This switches the camera to video mode.
- Click the video icon to start recording. It is the large white version of the video camera on the left side of the window. The time count in the bottom-centre of the preview screen will increase as you continue to record.
- Click the stop button to stop recording. It is the red square on the right side of the window. The video will stop recording immediately. The finished video will be saved to the 'Camera roll' folder inside your 'Photos' folder.
For previous versions such as Windows 7, please see if your laptop or webcam manufacturer has included a pre-installed software on your device. If there is not an appropriate software installed, please see scroll down to the guidance on recording using your smartphone or tablet.
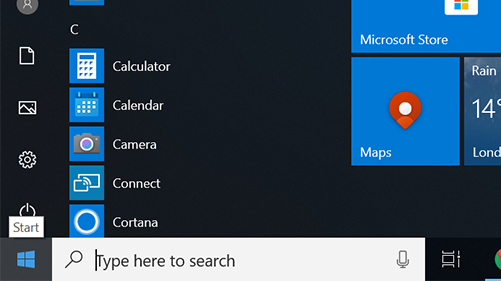
Step 1: Start menu
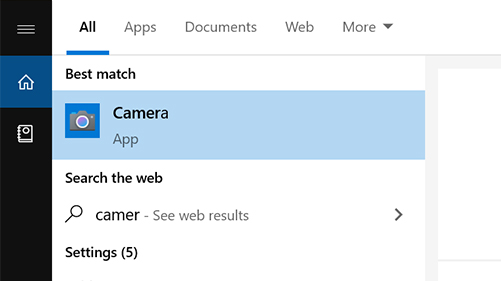
Step 2: Open the Camera app
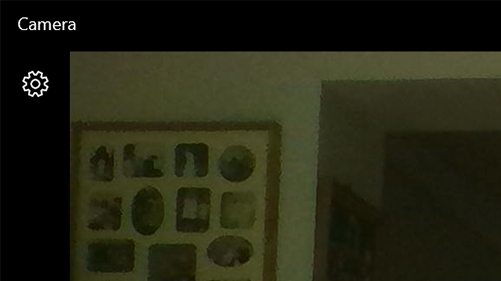
Step 4: Click 'Settings'
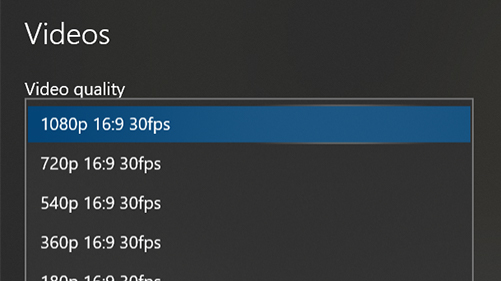
Step 5: Adjust your quality settings
Step 7: Hit 'Record'
Step 8: Stop recording
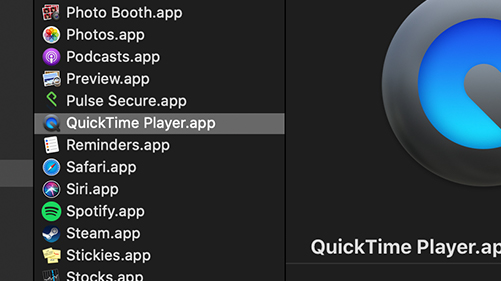
Using a Mac
- Download QuickTime
- Follow the installation process
- Open QuickTime when you are ready to record
- Click 'File > New Movie Recording'
- If asked 'to allow the app permission to access your webcam and microphone', give all requested permissions
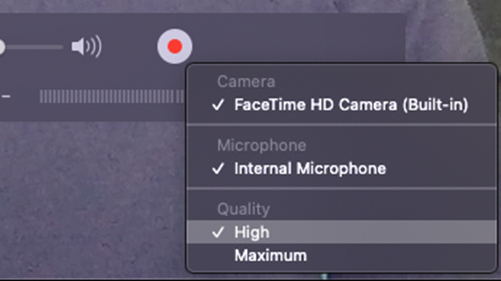
- Click the small downward-facing arrow next to the record button. Ensure your video quality is set to ‘high’ or 'maximum'. Note that the higher the setting, the larger the file size
- When you are ready, click record
- When you are finished with your recording, click stop
- Ensure you save your file before quitting QuickTime.
Step 3: Open Quicktime
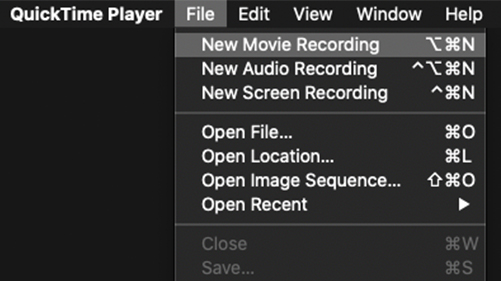
Step 4: Select 'New Movie Recording'
Step 6: Adjust your quality settings
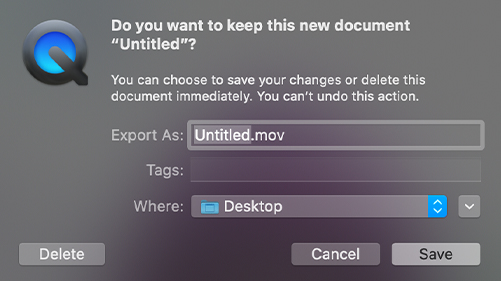
Step 9: Save your recording
Recording using Zoom
Please note: the below guidance is aimed at those producing marketing assets only. For guidance on learning and teaching recordings, please see the Guided Learner Journey module on Canvas (staff only).
If you wish to record a live discussion or interview with fellow staff, students or an external guest through Zoom then please follow the guidelines below. Recording Zoom should not be used for recording video statements of yourself, please use offline recording methods.
Tips for Zoom recordings
- For streaming or taking part in live discussion it is advised to wear headphones so computer audio (other participants) are not heard through your microphone
- Please make sure you have the permission of all participants before recording
- Check your internet connection, and those of other participants, and do a test run prior to recording
Before you start
Check your internet connection
The internet connection you have will greatly influence which option of live contribution you can use. Where possible, a wired connection on campus is preferred, although home broadband is acceptable in most cases. 4G/5G may also be OK, depending on what data plan you have (long sessions can use a lot of data).
You should have a broadband or fibre-based internet connection ideally with at least 0.6Mbps (up/down) for high quality video or 0.8Mbps/1.0Mbps (up/down) for panel discussions. Please use this speed test to determine if you are able to achieve this. If using Wi-Fi please ensure that you have good signal to the router installed in your home.
If you use video call services from home and normally experience stuttering or low-quality video yet have a good result from the speed test above, then please make sure no one else in the household is utilising a lot of bandwidth by watching video services such as YouTube and Netflix.
Optimise your setings
For the best results, you and any other participants, should optimise your Zoom settings as below. You may wish to reset these after the recording is complete.
Ready to hit record?
- Ensure there is a stable connection before committing to recording
- Make sure you are in Speaker View to record in fullscreen, or Gallery View to record a grid of all participants
- Disable the microphones and cameras of those on the call other than the person being recorded
- Hit Record at the bottom of the window. If presented with the option, save the recording to the cloud
- All participants should ensure 'Enable original sound' is ticked at the top left of the screen.
Sharing your recording
In your browser visit https://herts-ac-uk.zoom.us and log in with your University credentials.
- Go to Settings on the left
- Select the Recordings tab
- Fine the recording and click Share
- A password is added by default, make sure to note this down. Select whether the recording is to be viewed/downloaded publicly or only by those within the University
- Click Copy Sharing Information.
Full guidance can be found on Zoom's support site.
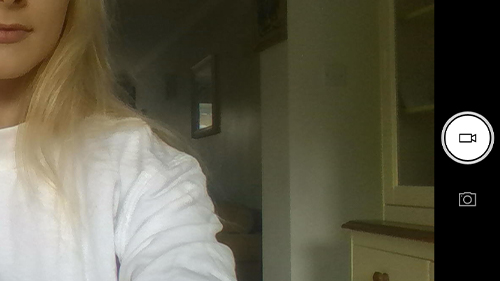
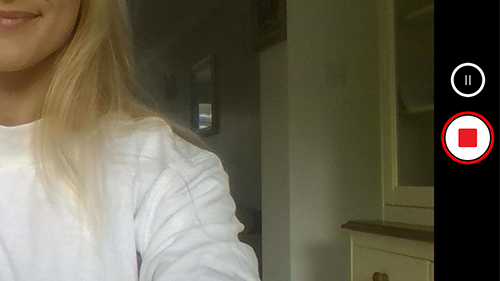
Recording using your phone or tablet
- Please consider the mode of delivery when filming using a handheld device. Most video content will be viewed in landscape orientation, so you should hold your device horizontally. Content for Instagram Stories/TikTok and some other forms of short-form content may require you to film in portrait orientation
- For the best quality, ensure your device is positioned at eyeline level, in a stable position. Do not hold the device yourself – rest on a shelf or table to avoid handling noise
- Avoid using headphones unless the built-in microphone is of poor quality. If this is the case, use wireless earphones as an alternative
- Use your default camera app to create the video recording
- Try to look into the camera lens and not at the screen
Do use your phone in landscape orientation
Don't use your phone in portrait orientation

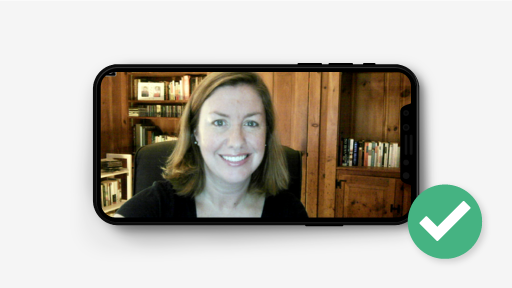
Do position your device in a stable manner at eye level

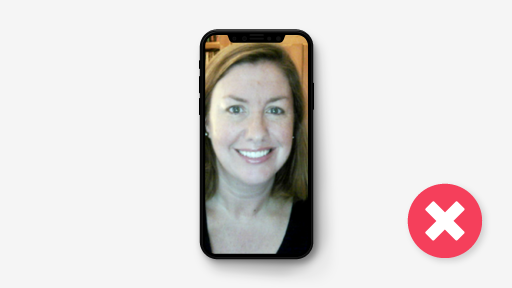
Don't position your device above or below eye level
Related Guidance
Get in touch
If you have any questions please contact a member of the team:
| Contact | |
|---|---|
| Studio team, Marketing and Communications | studio@herts.ac.uk |
| Jak Kimsey, Head of Digital and Creative Experience (he/him) | j.kimsey1@herts.ac.uk |
| Marketing and Communications Business Support | marketinguh@herts.ac.uk |