
Creating a news story
Before you start
Please consider
 What you are trying to promote by releasing the news story.
- What you can link to on the University website to offer the reader more information in regard to your story.
- The language you use and ensure the story is written in a web friendly format according to the University's guidelines for written content.
What you need
To create a news story in Edit+, you will need the following information at hand:
- Image
- News title
- News summary – 1 or 2 sentences
- The main news story
- Links to supporting information
- Contact details – name, email and telephone number
It is best practice to publish a news story only when all information can be provided. Avoid using 'To be confirmed' unless absolutely necessary.
What to do
Upload the image
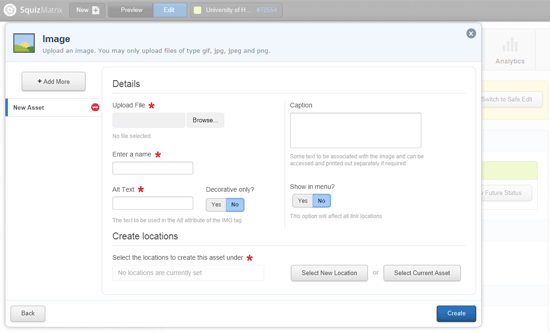 Size: 1074 x 500
Start by uploading your image.
- Open Edit+ by adding '/_edit' at the end of any url on the University's website.
- Click the 'New' button on the black strip at the top of the Edit+ screen. Select 'Files' and 'Image' from the window that appears.
- Browse to find the image file on your computer. Please ensure that your image has been cropped to 1074 x 500 before you upload it to Edit+.
- Enter a name, alt text and caption for your image. (The alt text should describe in a few words what you can see in the image. The caption is a slightly longer description. Both will help search engines and screen readers interpret the content of the image.)
- Set 'Decorative only' to no.
- Set 'Show in menu' to no.
- Choose 'Select new location' and use the asset finder to choose the folders 'Images > News > Relevant year' before clicking the blue select button.
- Click the blue 'Create' button. (Note: Be careful not to click the close button that will appear in the same location in the next window.)
- Click the 'Edit' button that appears towards the top right-hand side of the screen – this takes you to the details screen of your image asset.
- Change the status of your image to 'Approve and make live' using the drop down menu.
- Click the green 'Save' button in the top right-hand corner of the screen.
Create a standard page
 Next you will create the web page for your news story.
- Click the 'New' button on the black strip at the top of the Edit+ screen.
- Select 'Standard page' from the pop up window.
- Enter the title for your news story.
- Set 'Show in menu' to no.
- Choose 'Select new location' and use the asset finder to choose 'About us > News > Relevant year folder > Relevant month folder' before clicking the blue select button.
- Click the blue 'Create' button. (Note: be careful not to click the close button that will appear in the same location in the next window.)
- Click the 'Edit' button that appears towards the top right-hand side of the screen – this takes you to the details screen of your news page.
Add the news
 Next, use the icons at the top of the page to add information on the details, contents and metadata screens.
Details screen
- Add your image to the news page by clicking the select button under 'Related Image'.
- Use the asset finder to locate the image you uploaded under 'Images > News > Year > Month'.
- Click select to insert the image.
- Click the green 'Save' button to save the updated details page.
Content screen
Write your content directly in Edit+ or copy your text from Word. Then click Save.
If you copy text from Word, 'hidden' HTML code may be copied across when you paste the text in to Edit+. To remove the hidden code...
- Click 'Save' then highlight the text that you pasted in from Word.
- Click on the small brush icon in the toolbar above the text area.
- Click 'Save' again.
You may not see any difference in the editing window but the code will be cleaned in the background.
Remember to style the text using the icons on the Edit+ tool bar.
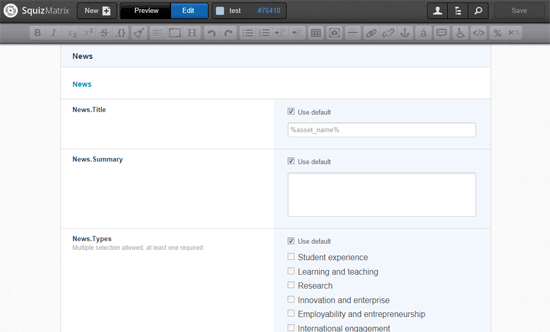
Metadata screen
Scroll down the long metadata screen until you find the News section. Untick the default option and add the following:
- News.Summary – 1 or 2 sentences introducing your news story. The text will be visible together with the news title on the listing pages.
- News.Types
- Featured.News – For use by the Press and PR team only. Selecting 'Yes' will add the news story to the top of the Press and PR Team's news listing page, above the automatic news feed.
- News.Contact.Name
- News.Contact.Email
- News.Contact.Phone
- News.Events.Options – Select the options relevant to your news story. The 'Corporate' tag is to be used by the Press and PR Team only.
Scroll to the bottom of the metadata page and select the relevant Schools from the 'School News Events' section.
Click 'Save'.
Publish your news story
Before you publish the story, check that all the details are correct and that the links work as expected.
- Click the 'Preview' button to review the content.
- Click the 'Edit' button to return to the editing mode.
- When you are ready to publish the news story, change the status on the 'Details' screen from 'Under construction' to 'Approve'.
- Click 'Save'.
- Change the status on the 'Details' screen to 'Apply for approval'.
- Click 'Save'.
Workflow
All news stories go through the PR and Media team to be approved.
There is no workflow on news story images that are placed in the correct folder.